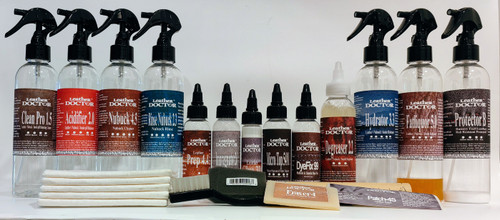
Nubuck Leather Restorative Cleaning & Repair Kit N4.cr by Leather Doctor degrease, pH balance, clean, rinse, hydrate, condition, protect, dye fix, glue & repair.
Stiffness, stretches, looseness, cracks, splits and rips are structure weakness mainly due to the lack of original fatliquor.
Fatliquor (fat and oil) content when first process by modern tannery averages 14%.
As fatliquor is a VOC (volatile organic compound) it will diminishes through evaporation and heat accelerated the diminishing rate, just like our car engine oil.
Standard for leather tensile strength is about 2000psi and below 1800psi the leather is prone to rip.
Industrial application will need above 6000psi and the useful tensile strength all depends on the fatliquor – the lifeblood of leathers.
When leather is stiff the fibrils becomes stick together or the inter-fibrillary spaces collapse void of air spaces.
Hydrator-3.3 is used to relaxed and reverse the stick together and replace the air spaces preconditioning it, so that the Fatliquor-5.0 will distribute among the inter-fibrillary spaces more efficiently to supple-up the leather when dry.
Water content then evaporates from the inter-fibrillary spaces and air takes over allowing for natural leather transpiration with seating comfort.
Color loss through sun fading is rejuvenated with Hydrator-3.3 as well to release excess dyestuff from the leather thickness to resurface.
Stretches or looseness results in extra softness with weakness to the leather structure especially to the cushion seats that does not look as smart and taut and often appears like expanded soft belly wrinkles with excess.
Correction is done with Impregnator-26 a protein compact resin-blend compound with the abilities to impregnate, fills and tightens-up structure looseness.
Cracks begin to appear on weak structure when stressed with body weight.
Bonding repair is done with Bond-3D and filled with donor suede fibres for added strength.
Repair luster if any is camouflage or knockdown with MicroTop-54D.
Splits and rips are tear through that will require a sub-patch for added support for strength in the Bond-3D > Patch-4S system.
Restorative surface cleaning precedes the structure rejuvenating and repairs.
All the 3 levels of cleaning may overlap one over the other in this sequence:
1) Degreasing to body oil, grease and sweat is done with Degreaser-2.2 > Acidifier-2.0 system.
2) Protonating or pH balancing cleaning to structural weakness is done with CleanPro-1.5 > Acidifier-2.0 system.
3) Restorative general soil cleaning is done with Prep-4.4 > Clean-3.8 > Rinse-3.0 system.
The fine velvet naps are groom, exfoliated and renewed with Brush-2, Eraser-4 and Sand-3.
Protector-S is scentless or Protector-S+ version that diffused a classic leather-scent to enhance the leather more sensuously.
It impart a silky feel to the fine nap with a finger writing effect a characteristically of nubuck also known as velvet suede.
Note that all product suffix numbers denotes it pH value.
Instruction:
The entire restoration process is made out of the ‘Wet’ and the ‘Dry’ process.
A) Wet Process: Sequence-1 to Sequence-6.
B) Dry Process: Sequence-7 to Sequence-9
Sequence-1: Degreasing System – Degreaser-2.2 > Acidifier-2.0.
Recommended to body contact areas like the headrest and hand rest are the common areas where sheen builds up.
Instruction:
- Surface soiling is removed by Brush-2, Eraser-4 and/or Sand-3 with white terry towel extraction and vacuuming.
- Degreaser-2.2 is shake up to gel, spread and agitate with Brush-2 or Eraser-4 and towel extract until towel shows clean; and repeat as necessary.
- Acidifier-2.0 is used as rinse and is spray and towel extracted until towel shows clean.
- Proceed to Sequence-2.
Sequence-2: Protonating Cleaning System – ProClean-1.5 > Acidifier-2.0.
Recommended to other accumulative soiling surface including over the areas covered by Sequence-1 above.
Instruction:
- CleanPro-1.5 is spray and agitates with Brush-2 and Eraser-4. Suspended soiling is white terry towel extracted until towel shows clean.
- Acidifier-2.0 is used as rinse and is spray and towel extracted until towel shows clean.
- Proceed to Sequence-3.
Sequence-3: Restorative Cleaning System – Prep-4.4.
Recommended to remaining heavy soiling, gum, tape, newsprints transfer, ink and some dyestuff stains.
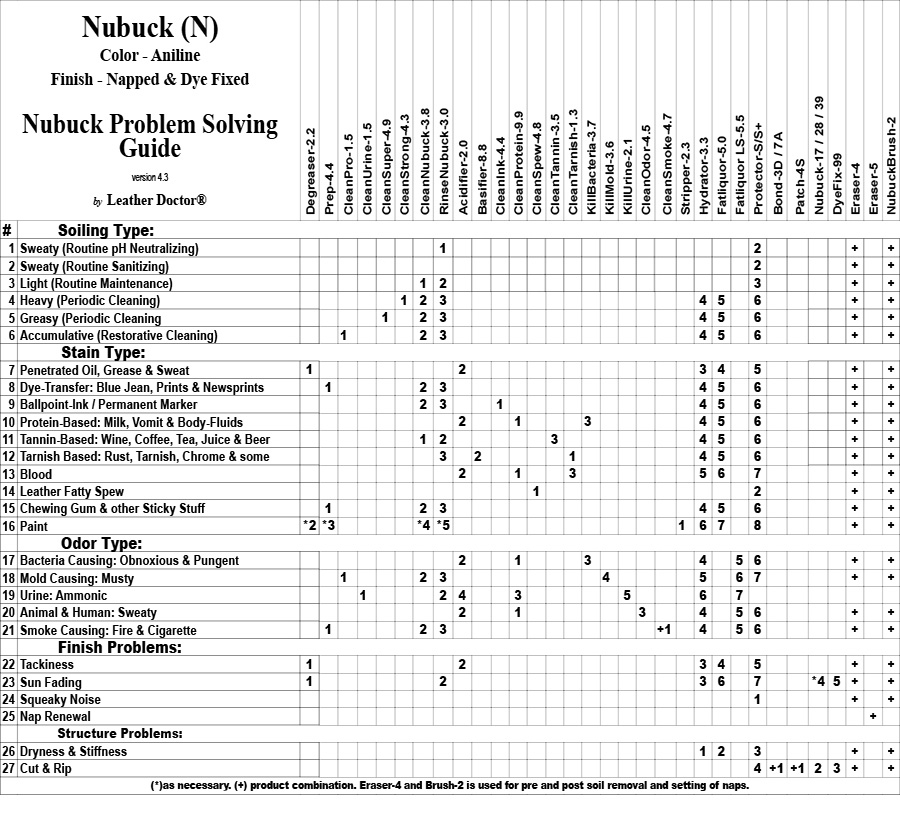
All other remaining compound stains are treated accordingly to the Nubuck-(N) Leather Problem Solving Guide.
Instruction:
- Prep-4.4 is applied and the heavy soiling or stains are treated accordingly.
- Towel-T5 is used for reverse transfer suspended soiling by the wicking process.
- Proceed to Sequence-4.
Sequence-4: General Cleaning System – Clean-3.8 > Rinse-3.0.
Recommended to the entire nubuck surface without leaving any dry edges.
Instruction:
- Clean-3.8 is spray and agitates with Brush-2 and Eraser-4 accordingly. Released soiling is extracted with a white terry cotton towel until it shows clean.
- Rinse-3.0 is spray and agitates with Brush-2 and Eraser-4 accordingly. Released soiling is again extracted with a white terry cotton towel until it shows clean.
- Proceed to Sequence-5.
Sequence-5A: Soiling Wicking System – Hydrator-3.3.
Recommended for penetrated soiling, just like an iceberg where the bigger amount of soiling is below surface will need Hydrator-3.3 with its surface-active power to wick the soiling to the surface.
Instruction:
- Hydrator-3.3 is applied to the thickness of the leather fully saturated with moisture oozing out when squeeze with fingers and thumb. It is left to dwell up to 72 hours with control evaporation wrapped with cling wrapper. Cling wrapper is removed and Towel-T5 is soaked with Hydrator-3.3 and place skintight without any airspace in between with the help of horsehair Brush-1.
- The nubuck is left to crispy dry and the soiled Towel-T5 is peeled off. The entire surface is hydrated again for an even appearance, preconditioning it and proceeds to Sequence-6.
Sequence-5A: Rejuvenate Sun Fading System – Hydrator-3.3.
Recommended to sun fading to activate and release excess dyestuff from the thickness of the leather to re-surface.
Instruction:
- Hydrator-3.3 is applied to the thickness of the leather fully saturated with moisture oozing out when squeeze with fingers and thumb. It is left to dwell up to 72 hours with control evaporation wrapped with cling wrapper. Cling wrapper is removed and moisture content is towel extracted until it shows dry.
- Proceed to Sequence-6.
Sequence-6: Leather Rejuvenation System – Fatliquor-5.0 (scentless) or Fatliquor.LS-5.5 (leather-scented).
This is the last of the ‘wet’ process where the nubuck will received the fatliquor (fat and oil) for essential softness with strength for practical usage without stiffness, cracking or tearing when dry. Optimum fat and oil content is up to 14% when measured with a leather moisture meter or an equivalent wood moisture meter.
Instruction:
- Fatliquor-5.0 is applied to the thickness of the leather fully saturated with an even appearance. When the water content evaporates up to 25%, more is added until the predetermined amount is decided.
- The nubuck is left to slow natural drying for extra softness.
Sequence-7: Re-Napping System: – Brush-2 > Erazer-4 > Sand-3.
‘Dry’ process starts with dry soil removal with the above-mentioned tools. Residues are terry cotton towel extracted and vacuumed. Surface is dry prepared ready for desired repairs.
Instruction:
- Used in this sequence - Brush-2 > Erazer-4 > Sand-3.
Sequence-8A: Cracking Repair System: - Impregnator-26.
Recommended to crack lines to tighten looseness and surface nap is avoided, otherwise the nap will be sealed and re-napping is almost impossible.
Instruction:
1) Used a plastic pipette for better control or a super fine brush that matches the crack width.
Sequence-8B: Caulking Repair System: - Bond-3D > Bond-7A > MicroTop-54D.
Recommend to seal gaps with this self leveling Bond-3D. Use Bond-7A to adjust or level out Bond-3D as an option. MicroTop-54D is used to knockdown unwanted luster. Nap surface is to be avoided, otherwise the nap will be sealed and re-napping is almost impossible.
Instruction:
- Used a plastic pipette for better control or a super fine brush that matches the crack width.
Sequence-8C: Rip and Tear Repair System: - Bond-3D > Patch-4S.
Recommended for tear or rip repair for extra strength.
Instruction:
- Bond-3D is applied to the suede side of the Patch-4S and to the lower edge of the nubuck underside with open-end tear.
- In a close-end rip the patch is first place below the nubuck suede side of the Patch-4S facing up and Bond-3D is applied to the lower side edge and let dry before bonding the other side. Caulking to the seam is done as in Sequence-8B.
Sequence-9: Non-Stick, Rub-Resistant Protection System: Protector-S (scentless) or optional Protector-S+ (leather-scented).
Instruction:
- Apply Protector-S or S+ after shaking well, brush to even out appearance and brush to re-nap a finger writing effect when dry and is ready for use. Besides non-stick and rub-resistant, it impart a silky-feel with a luxurious finger writing effect.
Here is the Nubuck (N) Leather Problem Solving Guide for reference:


