

Absorbent Leather Urine Cleaner 7.5
Leather Doctor® Absorbent Leather Urine Cleaner 7.5 is an excellent choice for a leather urine pre-cleaner because it is an ultra-mild, plant-derived non-ionic surfactant.
- It breaks down the lipid and protein components of the urine without stripping the leather's vital finish or causing trans-epidermal degradation.
- Furthermore, its natural properties help solubilize any micro-residues smoothly.
To clean a urine stain from leather before a holistic dovetailing odor decontamination process, you need a gentle pre-cleaner to lift the surface organic matter and a balanced rinse to remove residues without damaging the leather finish.
- Blot the Excess:
- Gently blot up any remaining wetness with a clean Microfiber Towel 3 without rubbing it deeper into the leather pores.
- Apply Cleaner 7.5:
- Dampen a fresh Microfiber Towel 3 with Cleaner 7.5 and lightly wipe the area working from the outside of the stain inward.
- Wipe Down with Rinse 4.2:
- Dampen another clean towel with Rinse 4.2 and thoroughly wipe the area to neutralize and pull away the cleaner residue.
- Dry Completely:
- Use a dry towel to absorb all surface moisture and allow the leather to air-dry completely before proceeding to Step 3/4 to relax and supple the leather structure.
| Factor | Target Details |
|---|---|
| Urine Neutralization |
Fresh urine salts (such as uric acid crystals ) are highly acidic. The inclusion of baking soda creates a mild alkaline environment that safely buffers and breaks down these organic odor precursors. The inclusion of baking soda creates a mild alkaline environment that safely buffers and breaks down these organic odor precursors. |
| Surfactant Behavior | Raw Caprylyl/Capryl Glucoside is naturally highly alkaline ( pH 11.5–12.5 ) to preserve its shelf life. Diluting it to 3% in distilled water alongside a small amount of baking soda results in a finished solution that sits near the 7.5–8.5 mark, safely below the raw chemical's harsh levels. |
| Material Protection | Real leather is slightly acidic ( pH 4.5–5.5 ). While a mild alkaline solution is briefly needed to pull the urine stain out of the porous leather surface, it should not be left on the material. Following this cleaner with your 5% vinegar rinse effectively snaps the leather back to its optimal, naturally acidic pH baseline. |
- What happens: The Caprylyl/Capryl Glucoside and baking soda work to break down the lipid, protein, and acidic uric acid components of the stain.
- Visual appearance: Because this cleaner is an aqueous solution, it rewets the porous leather. Wet leather naturally darkens, which can temporarily mask the cleaning action. Additionally, the surfactant liquefies and suspends the brown organic pigments on the surface, keeping them suspended in a localized wet film.
- What happens: The 5% white vinegar rinse chemically neutralizes the alkaline cleaner and remaining urine salts. More importantly, this is the physical extraction step where you wipe the suspended contaminants away from the leather matrix onto your microfiber cloth.
- Visual appearance: As the rinse lifts the emulsified brown pigments away and the leather begins to dry, you will see the stain lighten.
- .
- Never start in the middle and wipe outward.
- Working in a tightening spiral contains the liquid and prevents it from spreading horizontally.
- Wrap a clean, dry microfiber cloth tightly around your index finger or hand.
- Press down firmly on the stain to absorb liquid, then slightly roll your wrist to lift the cloth upwards.
- This creates a vertical pulling action that coaxes the urine pigments straight up out of the leather grain and into the microfiber, rather than dragging them sideways.
- Rotate your microfiber cloth to a completely fresh, clean section after every 2 to 3 dabs.
- Keep a stack of multiple clean, light-colored microfiber cloths nearby so you can easily spot when pigment is transferred.
- Lightly mist or drop the solution onto your cloth first.
- Wring the cloth out so it is only damp to the touch .
- Excess liquid will pool in the leather creases, migrate outward under the surface, and create a brand-new water ring stain that is larger than the original urine spot.
| Chemical & Physical Bottlenecks | What Happens to Your Leather |
|---|---|
| Ammonia Volatilization | Introducing a slightly alkaline cleaner (pH 7.5) to an already alkaline stain will actually accelerate the release of ammonia gas . It will immediately cause the sharp, acrid odor to off-gas violently into the room. |
| Inability to Dissolve Crystals | Old urine leaves behind hard, insoluble uric acid crystals and ammonium salts bound tightly to the leather fibers. These crystals require a distinctly acidic pH to be broken down and dissolved. A pH 7.5 solution lacks the hydrogen ion concentration needed to crack them. |
| Severe Leather Damage |
Leather's natural pH is acidic, sitting between 4.5 and 5.5 . The long-standing alkaline ammonia has already "etched" and weakened the leather fibers. Adding another alkaline solution further compromises the protein matrix, increasing the risk of cracking, color bleeding, or permanent hardening. |
- The Acid Neutralization Step (First): Skip the baking soda and glucoside mixture initially. Apply your 5% White Vinegar Rinse Recipe first . The acetic acid instantly bonds with the volatile alkaline ammonia, neutralizing the sharp odor at a molecular level and beginning the dissolution of the uric acid crystals. [1, 2, 3, 4]
- The Surfactant Step (Second): Once the ammonia is chemically subdued by the acid, you can use a purely pH-neutral or slightly acidic surfactant wash (such as Caprylyl/Capryl Glucoside diluted strictly in distilled water without the baking soda) to pull up the emulsified lipids and surface pigments. [1]
| Ingredient | Weight (Grams) | Percentage (%) | Purpose |
|---|---|---|---|
| Distilled Water | 96.4 g | 96.4% | Pure base carrier liquid |
| Caprylyl/Capryl Glucoside | 3.0 g | 3.0% | Mild non-ionic surfactant to lift lipids and pigments |
| Citric Acid (50% Solution) or White Vinegar * | 0.6 g | 0.6% | Acidify to neutralize surfactant alkalinity down to pH ~5.5 |
| Total | 100.0 g | 100.0% |
- Prepare the water phase: Weigh 96.4 g of distilled water into your mixing container.
- Add the acidifier: Add the 0.6 g of vinegar or citric acid solution to the water and stir briefly. This prepares the water to combat the high pH of the incoming surfactant.
- Incorporate the surfactant: Slowly weigh and pour 3.0 g of Caprylyl/Capryl Glucoside into the acidified water.
- Stir gently: Stir slowly with a spoon or glass rod until completely clear and uniform. Do not shake , as this surfactant will create dense foam that takes hours to settle.
- What to use: Pure 5% White Vinegar , applied completely undiluted.
- The technique: Dampen a clean microfiber towel until it is moist but not dripping. Place the damp towel directly flat over the dark center of the stain. Leave it to rest for 3 to 5 minutes to let the acetic acid vapor travel deep into the pores and break down the alkaline salts.
- The extraction: Remove the cloth and immediately use a fresh, dry microfiber towel to firmly press, roll, and pull the released contaminants vertically upwards out of the cushion.
- What to use: A dedicated Leather Degreaser Gel (or a specialized leather oil extractor poultice powder).
- How it works: These products are engineered to be applied as a thick paste. As the solvent base dries, it physically draws sub-surface oils and dark urine pigments upwards out of the leather pores, drying into a white powder that traps the contaminants.
- The technique: Apply a uniform layer over the dark area. Allow it to dry completely to a crusty powder (usually 1 to 2 hours). Vacuum or brush the powder away gently. Repeat this step until the powder no longer turns brown or yellow upon drying.
- What to use: Your pH-Neutral/Acidic Surfactant Wash (the recipe containing 96.4g Distilled Water, 3.0g Caprylyl/Capryl Glucoside, and 0.6g Citric Acid/Vinegar).
- The technique: Apply a small amount to a sponge, work it into a very minimal foam, and dab using the outside-in spiral method to lift any residual topical tracking. Wipe clean with a damp, water-only cloth and let it air dry completely.
- ⚠️ The Color Loss Risk: The ammonia has likely already destroyed the original tan/brown leather dyes underneath. When you successfully draw out the dark urine stain, you may reveal a lightened, bleached, or completely raw leather patch underneath. Prepare for the reality that the cushion may require a matching leather color dye restoration kit after it is thoroughly cleaned.
- ⚠️ Do Not Use Heat: Never use a hair dryer or heat gun to speed up the drying process on an ammonia-burned stain. Heat will bake any remaining proteins permanently into the leather fibers, turning the dark patch into a hard, brittle, irreversible crust.
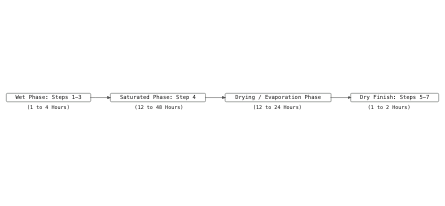
- Duration: 1 to 4 hours (Continuous)
- Protocol: Steps 1, 2, and 3 must be performed back-to-back while the leather is wet .
- Timing Rule: Do not allow the leather to dry between Steps 1 and 2. Because Step 1 elevates the pH up to 8.5, you must immediately apply the Step 2 acidifying rinse to pull the leather back to ..its safe iso-electric zone, which typically ranges between pH 4.5 and 5.0
its safe iso-electric zone (~4.5–5.0). Step 3 (Hydrator) is then immediately applied generously to saturate the core fibers and suspend the deeper urine crystals. [1, 2, 3]
- Duration: 12 to 48 hours (Depending on stain severity)
- Protocol: Apply the Step 4 Fatliquor while the leather is still damp from the Step 3 Hydrator.
- Timing Rule: To deal with a deep cat urine saturation, the leather is wrapped under clear plastic wrap during the Hydrator/Fatliquor stage to let the liquids deep-rinse the inner fiber structure without evaporating. This dwell phase lasts from 12 hours (for light or fresh surface accidents) up to 48 hours (for older, deeply embedded structural stains). [1, 2, 3]
- Duration: 12 to 24 hours
- Protocol: After the leather has absorbed its maximum amount of Fatliquor fat and oils, the plastic wrap is removed.
- Timing Rule: The leather must be allowed to dry naturally and slowly at room temperature. As the water content evaporates, the fat and oil particles chemically lock onto the leather fibers. Never speed this up with a hair dryer or heat vent, as forced heat will shrink and crack the wet hide. [1, 2, 3, 4]
- Duration: 1 to 2 hours
- Protocol: Performed sequentially once the leather is fully dry to the touch.
- Timing Rule: Step 5 (Anti-Urine/Odor control) is misted and lightly blotted. Once that light surface moisture layout evaporates (about 30 minutes), Step 6 is massaged in to optimize the tactile feel, and Step 7 is applied immediately after to seal the surface. [1, 2, 3, 4, 5]
Do we observe the lightening of the brown stain immediately after this Pre-Urine Cleaner Recipe or after the Rinse Recipe?
You will likely observe the most noticeable lightening of the brown stainafter the Rinse Recipe, rather than immediately after the Pre-Urine Cleaner step.
The process unfolds in two distinct stages due to how the chemistry interacts with the leather and the stain:
1. During the Pre-Urine Cleaner Phase (Surfactant & Solubilization)
- What happens: The Caprylyl/Capryl Glucoside and baking soda work to break down the lipid, protein, and acidic uric acid components of the stain.
- Visual appearance: Because this cleaner is an aqueous solution, it rewets the porous leather. Wet leather naturally darkens, which can temporarily mask the cleaning action. Additionally, the surfactant liquefies and suspends the brown organic pigments on the surface, keeping them suspended in a localized wet film.
2. During the Rinse Phase (Neutralization & Removal)
- What happens: The 5% white vinegar rinse chemically neutralizes the alkaline cleaner and remaining urine salts. More importantly, this is the physical extraction step where you wipe the suspended contaminants away from the leather matrix onto your microfiber cloth.
- Visual appearance: As the rinse lifts the emulsified brown pigments away and the leather begins to dry, you will see the stain lighten.
Pro-Tip for Leather: Leather always looks darker when damp. To accurately judge how much the brown stain has lightened, wait until the area has completely air-dried after the rinse step before evaluating the results or applying your essential oil treatment.
|
Factor |
Target Details |
|
Urine Neutralization |
|
|
Surfactant Behavior |
Raw Caprylyl/Capryl Glucoside is naturally highly alkaline ( pH 11.5–12.5 ) to preserve its shelf life. Diluting it to 3% in distilled water alongside a small amount of baking soda results in a finished solution that sits near the 7.5–8.5 mark, safely below the raw chemical's harsh levels. |
|
Material Protection |
Real leather is slightly acidic ( pH 4.5–5.5 ). While a mild alkaline solution is briefly needed to pull the urine stain out of the porous leather surface, it should not be left on the material. Following this cleaner with your 5% vinegar rinse effectively snaps the leather back to its optimal, naturally acidic pH baseline. |
Recipe & Sequence Breakdown
| Step | Formulation Name | pH Target | Active Mechanism | Audit & Chemistry Assessment |
|---|---|---|---|---|
| 1 | Pre-Urine Cleaner 7.5 | 7.5 – 8.5 | Caprylyl/Capryl Glucoside, Baking Soda | Risk of Darkening/Stiffening : Leather's stable pH is 4.5–5.0. An alkaline pH up to 8.5 helps solubilize fresh uric acid but can strip structural chromium/tannins if left too long. Glucoside is an excellent, gentle surfactant choice. |
| 2 | Urine Rinse 4.5 | 4.5 – 5.5 | Distilled Water, 5% White Vinegar | Excellent Neutralizer : Safely drops the leather back into its iso-electric comfort zone. Vinegar effectively converts volatile, smelly free ammonia (NH₃) into odorless ammonium salts (NH₄⁺). |
| 3 | Leather Hydrator 3.5 | 3.5 | Distilled Water, DPG, Citric Acid | Fiber Relaxation : DPG (solvent/humectant) and low pH open up the collapsed collagen fiber bundles of dry, stained leather, preparing it to absorb fatliquor evenly. |
| 4 | Leather Fatliquor 5.0 | 5.0 | Distilled Water, Atlas, Eureka, Germall | Crucial Correction : Cat urine contains salts that draw out natural oils, causing the leather to shrink and crack as it dries. Reintroducing lipids (Atlas/Eureka) at pH 5.0 restores suppleness. |
| 5 | Leather Anti-Urine 4.2 | 4.2 | Vinegar, Polysorbate 20, Essential Oils | Toxicity Warning : Tea Tree and Eucalyptus essential oils are highly toxic to cats if ingested or absorbed via paws. Furthermore, this steps masks odor rather than chemically destroying the resilient uric acid crystals. |
| 6 | Leather Feel & Scent 4.5 | 4.5 | Hemisqualane, Sodium Lactate, Perfume | Aesthetic Finish : Hemisqualane provides a silky, non-greasy surface feel, and sodium lactate acts as an efficient humectant to keep the leather soft. |
| 7 | Leather Shield 4.5 | 4.5 | PMX-1501, PEG-12 Dimethicone | Protection : Creates a breathable silicone barrier to repel future liquid spills without sealing the pores completely. |
Key Technical Improvements
-
Replace the Masking Oils in Step 5: Swap out Tea Tree and Eucalyptus for a commercial, leather-safe enzymatic or bio-catalytic odor eliminator that specifically targets uric acid without harming pets.
-
Control Step 1 Dwell Time: Because Step 1 pushes the leather into an alkaline state, apply it gently, work it into the stain, and move immediately to Step 2 to avoid permanent dye migration or structural fiber damage.
-
Extraction is Mandatory: Absorbent leather acts like a thick sponge. Wiping the surface is not enough. You must use a wet-vacuum or highly absorbent white terry towels under heavy pressure to physically extract the suspended urine slurry during Steps 1 and 2.
- Duration: 1 to 4 hours (Continuous)
- Protocol: Steps 1, 2, and 3 must be performed back-to-back while the leather is wet .
- Timing Rule: Do not allow the leather to dry between Steps 1 and 2. Because Step 1 elevates the pH up to 8.5, you must immediately
apply the Step 2 acidifying rinse to pull the leather back to its safe iso-electric zone (~4.5–5.0). Step 3 (Hydrator) is then immediately applied generously to saturate the core fibers and suspend the deeper urine crystals. [1, 2, 3]
- Duration: 12 to 48 hours (Depending on stain severity)
- Protocol: Apply the Step 4 Fatliquor while the leather is still damp from the Step 3 Hydrator.
- Timing Rule: To deal with a deep cat urine saturation, the leather is wrapped under clear plastic wrap during the Hydrator/Fatliquor stage to let the liquids deep-rinse the inner fiber structure without evaporating. This dwell phase lasts from 12 hours (for light or fresh surface accidents) up to 48 hours (for older, deeply embedded structural stains). [1, 2, 3]
- Duration: 12 to 24 hours
- Protocol: After the leather has absorbed its maximum amount of Fatliquor fat and oils, the plastic wrap is removed.
- Timing Rule: The leather must be allowed to dry naturally and slowly at room temperature. As the water content evaporates, the fat and oil particles chemically lock onto the leather fibers. Never speed this up with a hair dryer or heat vent, as forced heat will shrink and crack the wet hide. [1, 2, 3, 4]
- Duration: 1 to 2 hours
- Protocol: Performed sequentially once the leather is fully dry to the touch.
- Timing Rule: Step 5 (Anti-Urine/Odor control) is misted and lightly blotted. Once that light surface moisture layout evaporates (about 30 minutes), Step 6 is massaged in to optimize the tactile feel, and Step 7 is applied immediately after to seal the surface. [1, 2, 3, 4, 5]