
Why Aniline Leather Turns Sticky, Dark, or Rubbery
Posted by Roger Koh on 11th Feb 2026
Body Oil, Grease & Sweat Damage — and How Leather Doctor® Fixes It
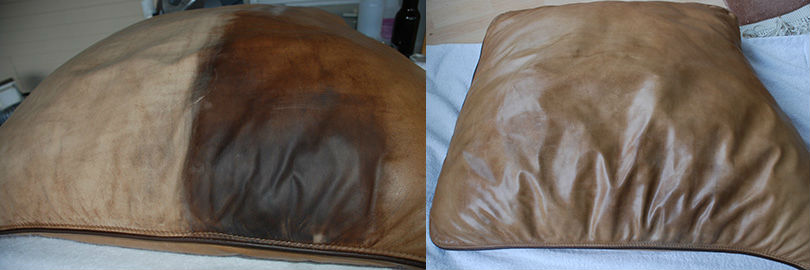
(Before & after images shown above: Aniline leather cushion damaged by prolonged body contact, and the same cushion after Leather Doctor® system restoration.)
The Common Misbelief: “Body Oil Ruins Leather Finishes”
Many leather owners are told that body oil or grease is what destroys leather finishes, causing surfaces to feel sticky, soft, or rubbery. While oils do play a role, they are rarely the root cause of serious aniline or semi-aniline leather failure.
Leather Doctor® diagnostics consistently show that the primary cause is sweat, not oil.
Understanding the difference is the key to permanent restoration.
Sebum vs. Sweat — What Really Happens to Leather
Sebum (Body Oil & Grease):
-
Lipid-based (fatty acids and oils)
-
Leather is designed to contain fats through fatliquoring
-
Excess oil may migrate out as spew / bloom
-
Can soften finishes temporarily
-
Does NOT chemically destroy leather fibers
Sweat (The Real Culprit):
-
Water-based, salt-laden, hygroscopic
-
Acidic when fresh, alkaline when aged and fermented
-
Penetrates deeply into aniline leather
-
Disrupts collagen’s amphoteric balance
-
Destabilizes tanning and denatures leather fibers
When sweat damage accumulates, leather begins to behave like rawhide, losing its ability to anchor finishes.
Why Aniline & Semi‑Aniline Leather Fail First
Aniline leathers are especially vulnerable because they:
-
Have minimal surface protection
-
Are highly absorbent
-
Sit in direct contact with skin (arms, head, legs)
-
Allow sweat salts to penetrate rapidly
Once sweat alters the internal fiber chemistry:
-
Finishes lose adhesion
-
Surfaces turn sticky or rubbery
-
Recoating repeatedly fails
This is fiber failure, not coating failure.
Why Re‑Dyeing or Re‑Coating Alone Fails
Many repairs attempt to:
-
Sand the surface
-
Apply dye instead of pigment
-
Skip topcoats
While dyes penetrate fibers, they do not re‑stabilize collagen, rebalance pH, or remove sweat salts. Without internal correction, stickiness and darkening return.
The Leather Doctor® Diagnostic & Restoration System
A Fiber-First, Chemistry-Correct Approach
Leather Doctor® restoration is based on correcting internal fiber chemistry before surface refinishing, ensuring long-term stability, adhesion, and performance.
Step 1 — Sweat & Oil Decontamination
Products:
Purpose:
-
Emulsify and extract body oils and grease
-
Rinse away sweat residues, salts, and contaminants
-
Halt ongoing chemical attack within the leather fibers
This step removes both lipid and water-borne contaminants that interfere with leather stability and finish adhesion.
Step 2 — pH & Ionic Rebalancing
Product:
Purpose:
-
Restore correct leather pH balance
-
Reverse early-stage collagen denaturation
-
Strengthen internal ionic attraction between fibers
Proper pH and ionic balance are essential to stabilize the tanning system and prevent leather from reverting toward rawhide behavior.
Step 3 — Fiber Rehydration
Product:
Purpose:
-
Relax hardened or compacted fibers
-
Restore internal moisture pathways
-
Improve fiber mobility and receptivity to treatment
This step prevents continued fiber stiffening and prepares leather for effective fatliquoring and recoloring.
Step 4 — Structural Fatliquoring (Not Greasing)
Product:
Purpose:
-
Replace depleted internal lubricants
-
Restore flexibility without surface oiling
-
Anchor lubrication within the collagen structure
Unlike surface conditioners or oils, Fatliquor chemically bonds inside the fiber network. Any surface residue is either reactivated with Hydrator 3.3 to encourage penetration or removed to control surface tension and ensure proper adhesion during subsequent priming and coating.
Step 5 — Priming for Effective Pigment Coating
Product:
Purpose:
-
Smooth and seal the surface
-
Equalize absorption
-
Enhance adhesion for pigment coatings
Priming creates a uniform and stable base for controlled color application.
Step 6 — Correct Color Restoration
Products:
Color selection is based on:
-
Original leather type
-
Absorption uniformity
-
Structural condition of fibers
Dyes are used only after fiber stabilization to ensure even penetration, colorfastness, and long-term performance.
Step 7 — Matching Topcoat to Seal Dye or Pigment
Products:
Purpose:
-
Seal dyes or pigments against rub-off and bleeding
-
Adjust and match original surface luster
-
Provide controlled surface protection without blocking breathability
Step 8 — Breathable, Rub-Resistant Protection
Products:
Purpose:
-
Reduce friction and abrasion wear
-
Maintain leather breathability
-
Provide rub-resistant protection in high-contact areas
This final step helps prevent repeat damage—especially on armrests, headrests, and seat cushions.
Core Principle
Lasting leather restoration is achieved by correcting fiber chemistry first, then rebuilding color and protection in a controlled, compatible system.
What the Before & After Images Show
Before:
-
Darkened, blotchy absorption
-
Sticky, rubbery surface feel
-
Sweat‑denatured fiber zones
After Leather Doctor® System:
-
Restored even tone
-
Dry, clean hand‑feel
-
Stabilized fibers
-
Long‑term finish adhesion
Key Takeaway for Leather Owners
Sticky or failing leather finishes are not caused by “too much oil.”
They are caused by sweat‑induced chemical breakdown inside the leather.
Only a system that:
-
Removes sweat contamination
-
Rebalances fiber chemistry
-
Restores internal lubrication
-
Then recolors and protects
can deliver lasting restoration.