
Why Vachetta Leather Develops Mold, Cracking, and Browning — and How to Restore It Safely
Posted by Roger Koh on 31st Jan 2026
Vachetta leather is one of the most beautiful — and most vulnerable — leathers in the world.
As a naked, unfinished vegetable-tanned leather, it has no protective coating. This means it absorbs moisture, body oils, and environmental contamination instantly.
In this case study, a Vachetta leather sofa was shipped from a humid tropical climate (Singapore) to a temperate environment (Sydney). During transit, the leather developed mold growth, cracking, browning rings, and dimensional distortion.
This article explains why these issues occur together, and outlines a Leather-Safe™ step-by-step restoration system to correct them without damaging the leather’s natural character.
What the Leather Is Telling Us?


Section 1 — Visual Diagnosis
These photos show multiple overlapping failures occurring at the same time — a common mistake is to treat them as separate problems.
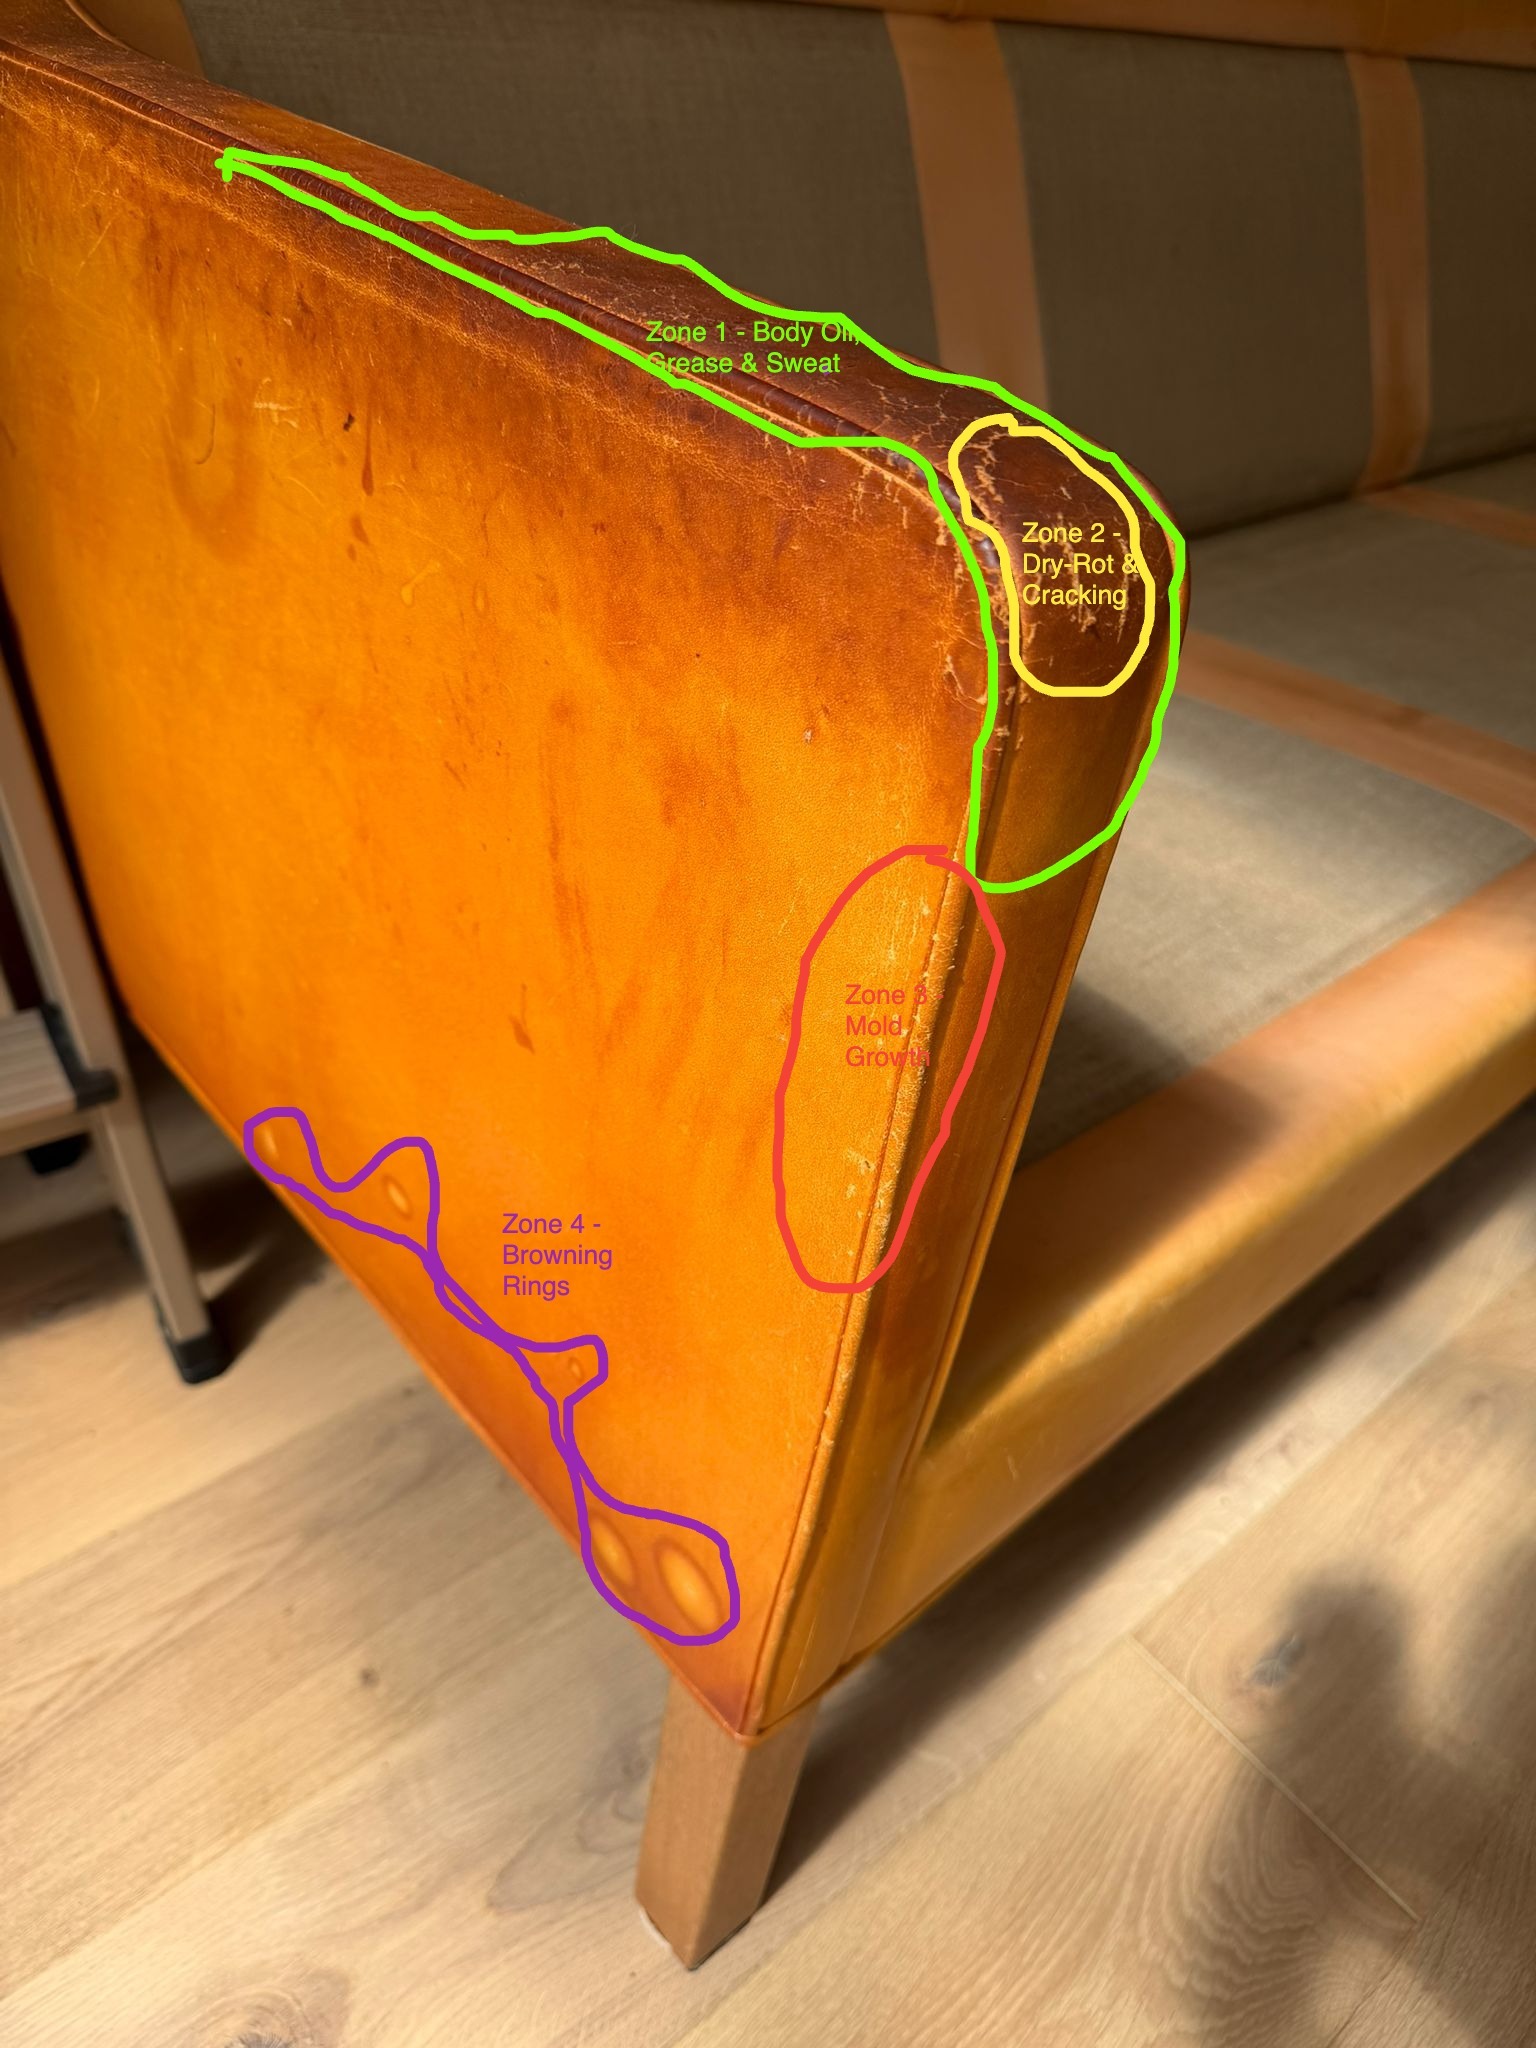
Section 2 — Zone-Based Leather Diagnosis:
Zone 1 — Body Oil, Grease & Sweat
- Darkening
- Patchy tone
- Nutrient base for mold
Cause: Absorbed body contamination oxidizes and turns alkaline.
Zone 2 — Dry-Rot & Cracking
- Crackings
- Stiff hand feel
Cause: Loss of bound moisture and internal lubrication.
Zone 3 — Mold Growth
- White or grey speckling
- Random distribution
Cause: Humidity + organic contamination + lack of airflow.
Zone 4 — Browning Rings & Discoloration
- Tide marks
- Oxidation halos
Cause: Alkaline migration and oxidized tannins.
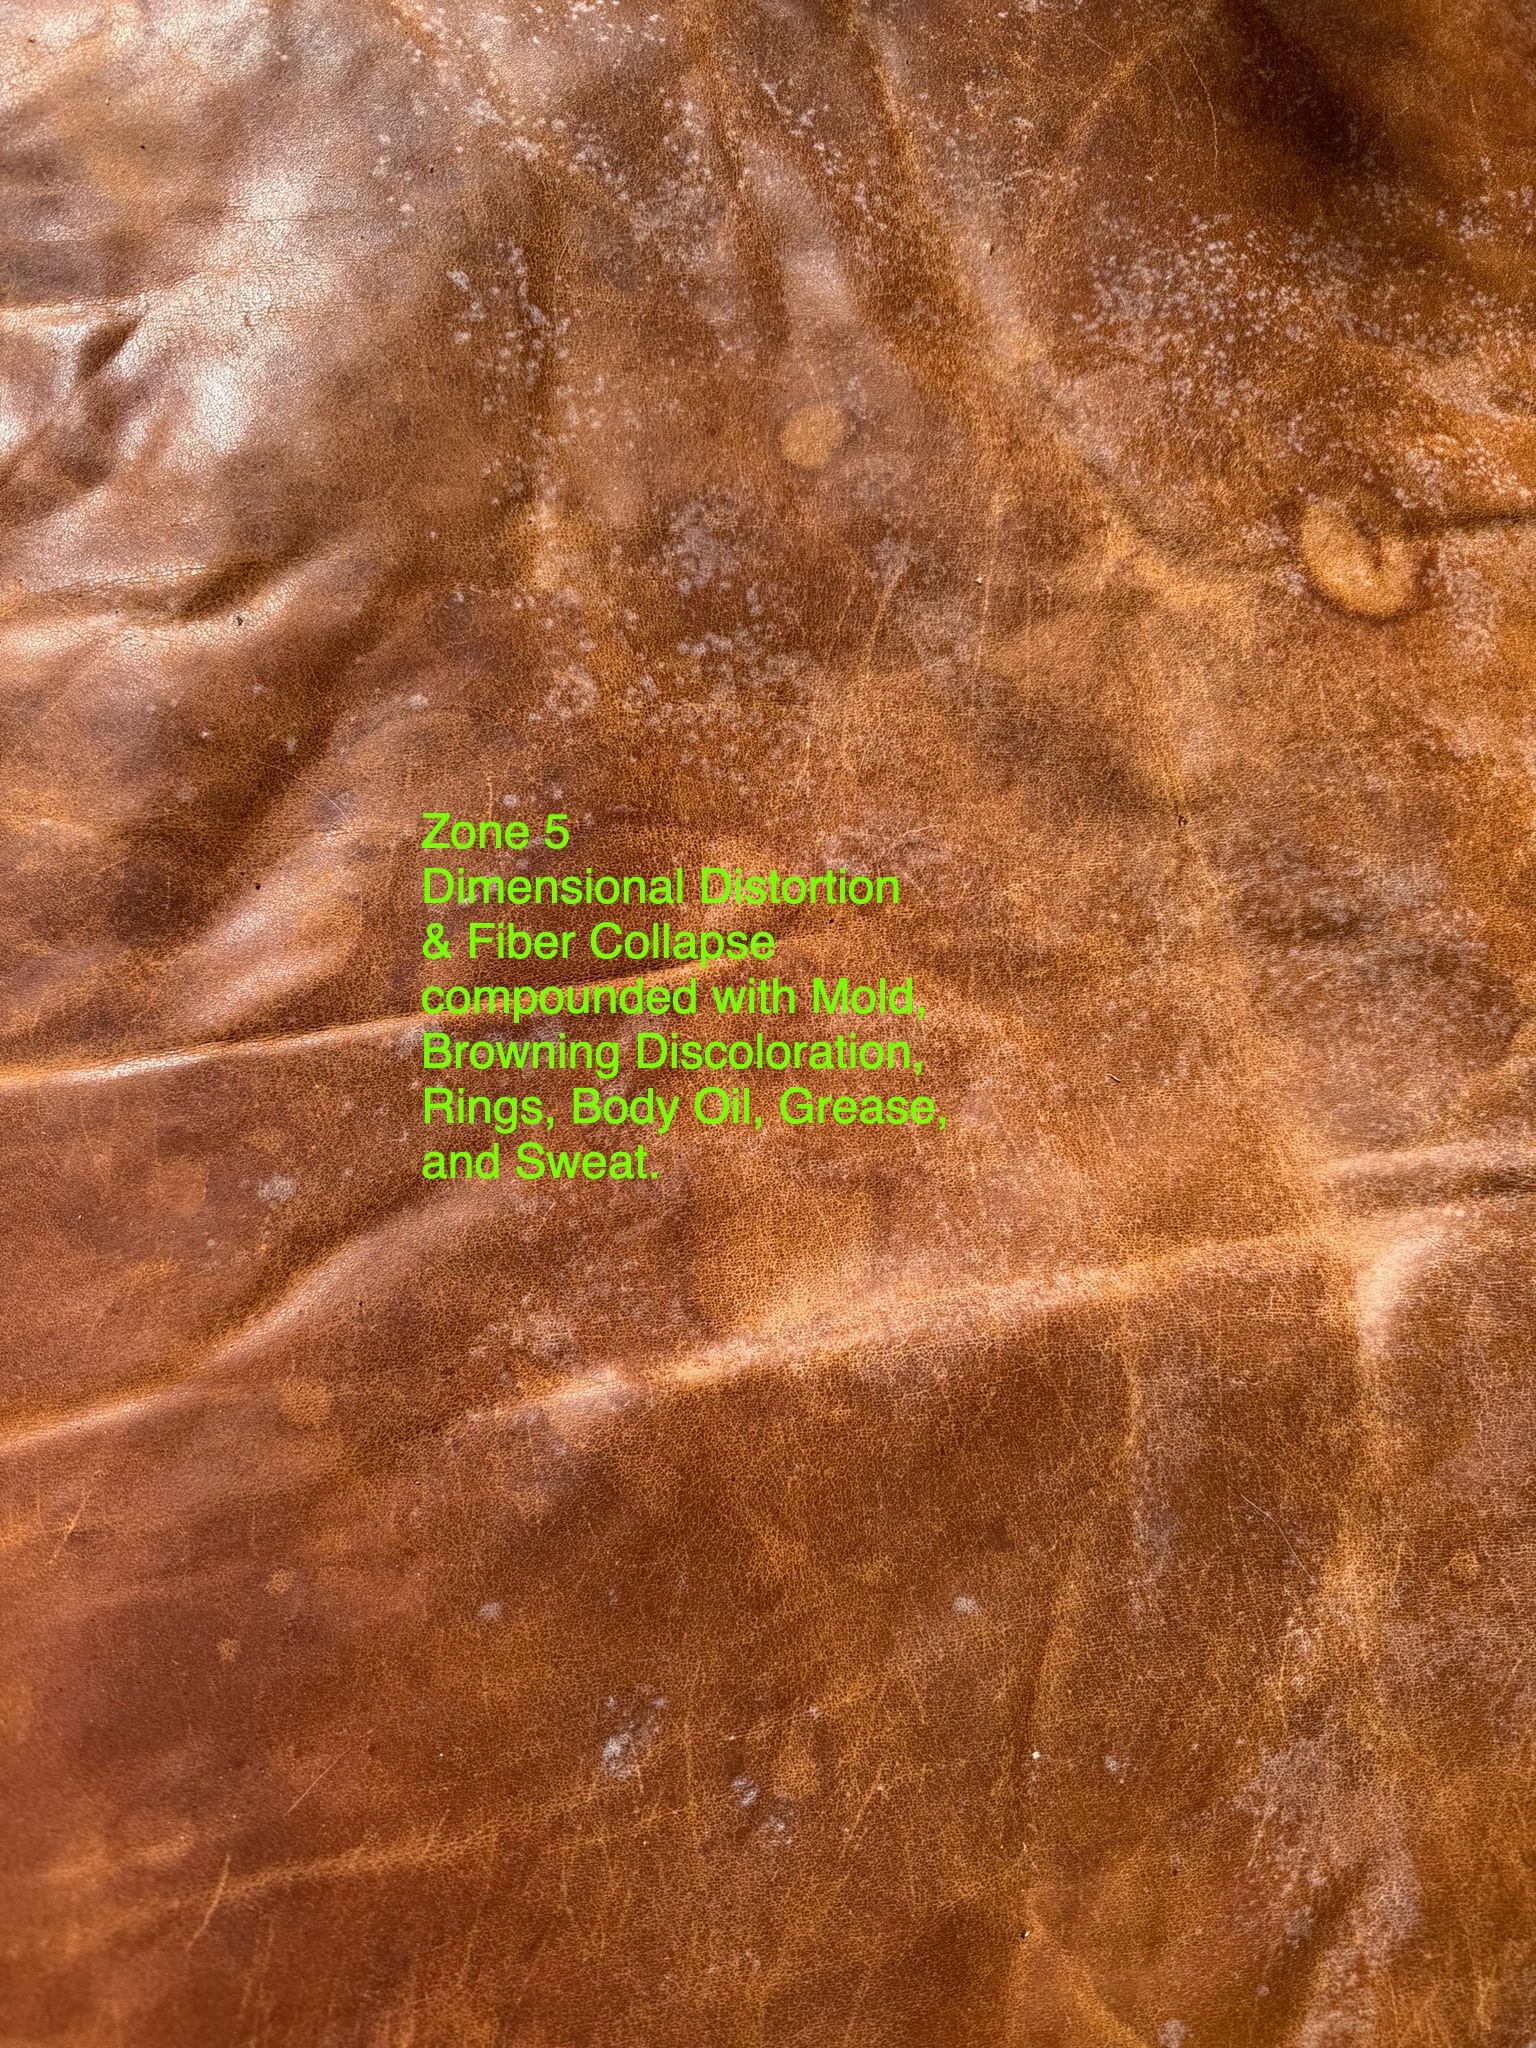
Zone 5 — Dimensional Distortion & Coarse Breaks
- Sharp creases
- Unnatural folds
- Loss of drape
Cause: Fiber collapse from dehydration, fat, and oil loss.
These zones rarely occur alone — they interact and compound damage.
Section 3 — Why Sequence Matters (Leather-Safe™ Principle)
Vachetta leather fails when contamination is sealed inside the fiber structure.
Conditioning without decontamination locks in mold, alkalinity, and stiffness.
Correct order:
Dry clean → Degrease → Rinse → Mold control → Hydrate → Fatliquor → Correct discoloration → Reduce friction
Section 4 — Step-by-Step Restoration System
Step 1 — Dry Surface Preparation
- Dry wipe/vacuum
- No water introduced
Step 2 — Degreasing (Optional but Critical)
Leather pH Balanced Degreaser 2.2
Removes body oil, grease, and sweat safely.
Step 3 — Rinsing & pH Reset
Leather Rinsing Conditioner 3.0
Flushes suspended contamination and rebalances leather.
Step 4 — Mold Cleaning
Leather Mold Cleaner 1.5
Cleans and removes mold without bleaching.
Step 5 — Mold Spore & Odor Control
Leather Mold Odor Killer 3.6
Prevents regrowth inside the fibers.
Step 6 — Deep Fiber Hydration
Leather Hydrating Conditioner 3.3
Relaxes stiff fibers and corrects dimensional distortion.
Step 7 — Fatliquoring
Leather Fatliquoring Conditioner 5.0
Restores elasticity, fullness, and strength.
Step 8 — Browning & Oxidation Correction
- Leather Acidifying Conditioner 2.0
- Vachetta Leather Redox Treatment Conditioner 2.8
Step 9 — Friction Reduction
Leather Buttery Feel Conditioner B
Slows future contamination and wear.
Section 5 — What Results to Expect
- Mold eliminated and controlled
- Cracking stabilized
- Browning reduced progressively
- Leather regains drape and flexibility
- Natural Vachetta character preserved
Restoration is progressive, not instant.
Section 6 — Preventive Care Philosophy
Vachetta leather does not need protection (it's a naked, unfinished leather).
It needs correct pH, moisture balance, and lubrication.
Regular light maintenance prevents:
- Mold recurrence
- Fiber collapse
- Irreversible darkening
Leather Doctor® systems are designed to work with the leather’s natural structure — not against it.
Understanding why leather fails is the first step to restoring it safely.